Soups & Stews
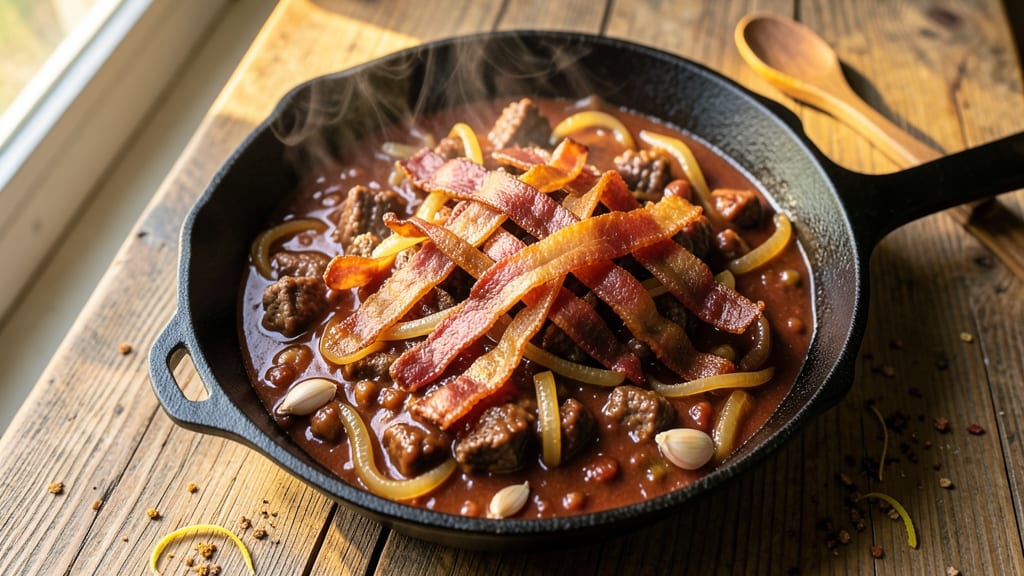
This beef and bacon chili recipe delivers smoky-spiced depth with every hearty bite—where tender beef and crispy bacon bits create the perfect texture contrast. 🔥 The secret lies in slow-simmered flavors that meld into a rich, satisfying broth, while crisp bacon on top adds that irresistible crunch.
I’ve perfected this version to be foolproof, with layers of warmth from chili powder and cumin that linger long after the last spoonful.
The magic happens in the browning—searing the beef and bacon until deeply caramelized builds a flavor foundation no shortcut can match. Then, it’s all about patience: letting the spices bloom in the oil before adding tomatoes and beans ensures balanced richness.
This isn’t just chili; it’s a restaurant-quality bowl of comfort that feels like a hug in a pot.
By the time you’re done, you’ll have a pot of chili where each spoonful delivers tender beef, smoky bacon, and a thick, velvety sauce that’s impossible to resist. The bacon bits on top stay crispy, adding a satisfying crunch that cuts through the hearty texture.
It’s the kind of dish that tastes even better the next day—perfect for meal prep or a cozy weeknight dinner.
Whether you’re feeding a crowd or just craving a bowl of warmth, this recipe delivers crispy edges and deep, satisfying flavors. Let’s get cooking—your taste buds will thank you.
Ingredients for beef and bacon chili
Here's what makes this chili restaurant-quality—crispy bacon, tender beef, and smoky spices that sing.
| Ingredient | Amount | Notes |
|---|---|---|
| Chuck Roast 🥩 | 2 lb | Cut into 1-inch cubes |
| Thick-Cut Bacon 🥓 | 12 oz | Cut into 1/2-inch pieces |
| Yellow Onion 🧅 | 1 whole | Diced, about 1.5 cups |
| Garlic Cloves 🧄 | 4 cloves | Minced |
| Chili Powder 🌶️ | 2 tbsp | Smoked preferred for depth |
| Ground Cumin 🌿 | 1 tbsp | Toasted for warmth |
| Diced Tomatoes 🍅 | 2 cans | 14.5 oz each, fire-roasted |
| Black Beans 🫘 | 2 cans | 15 oz each, drained |
| Kidney Beans 🫘 | 2 cans | 15 oz each, drained |
| Beef Broth 💧 | 2 cups | Low-sodium preferred |
| Olive Oil 🫒 | 2 tbsp | For searing |
| Salt 🧂 | 1 ½ tsp | Kosher preferred |
| Black Pepper 🌶️ | ½ tsp | Freshly ground |
| Bay Leaves 🍃 | 2 whole | For depth |
The chuck roast is non-negotiable—it melts into tender perfection while staying flavorful. Costco or Walmart usually have it pre-cut, but if you're buying whole, ask the butcher for the leanest cut possible. Bacon matters too: thick-cut from Applegate or Oscar Mayer stays crispy longer. For the beans, no-salt-added is key—you control the seasoning. And those fire-roasted diced tomatoes? Muir Glen is my go-to—they're sweeter and less acidic than store brands.
No chuck roast? Sirloin or flank steak works in a pinch, but cut it thin and marinate first. Bacon out of stock? Smoked turkey bacon gives a similar smokiness. The beans can be swapped for pinto or lentils, but soak them first. Spice level too mild? Add cayenne or hot sauce at the end. Fresh cumin? Toast it in a dry pan for 30 seconds—game-changer. The bay leaves? Tear them first so they infuse faster.
This chili gets better overnight—make extra. Store in airtight containers for 5 days or freeze for 3 months. For crispy bacon bits on top, fry them fresh or bake at 400°F for 10 minutes. Portion into meal-prep containers with a little extra bacon on top so it stays crispy when you reheat. Leftovers reheat beautifully—just add a splash of broth if it's too thick.
Why You'll Love This Recipe
- One-Pot Magic: I swear by this recipe when I’m too tired to clean dishes—just brown the chuck roast and bacon, toss everything in one pot, and let it simmer. The onions caramelize right into the chili, so you don’t even need to strain or fuss with extra steps.
- Smoky Bacon Crunch: That thick-cut bacon? It’s the star. The edges get crispy while the chili cooks, and every bite delivers a salty, smoky punch that cuts through the rich beef. Honestly, I’ll eat this chili just for the bacon bits alone.
- Meal Prep MVP: Between us, this chili tastes better the next day—perfect for prepping lunches or freezing for lazy evenings. The flavors meld overnight, and reheating it is just dump-and-heat simple. My husband’s favorite for Taco Tuesday, but it works for game days too.
- Budget-Friendly Powerhouse: Chuck roast and bacon stretch for days, and this recipe costs me half what takeout does. I’ll be real: it’s not the fanciest dish, but it’s hearty, filling, and always gets seconds. Plus, the chili powder and garlic make it feel like a restaurant meal without the price tag.
Step-by-step instructions for beef and bacon chili
Here's how to build rich, smoky chili with bacon so crispy it'll make your taste buds dance.
🔥 Step 1: Sear the Bacon and Chuck Roast for Maximum Flavor
Heat a large Dutch oven over medium-high heat and add the 12 oz thick-cut bacon in a single layer. Cook undisturbed for 5-6 minutes until the edges become deep golden brown and crispy. Use tongs to flip the bacon pieces and cook another 3-4 minutes until evenly browned. Remove the bacon with a slotted spoon and set aside on paper towels to drain.
In the same Dutch oven, add the 2 tbsp olive oil and let it heat for 1 minute. Add the 2 lb chuck roast cut into 1-inch cubes and sear for 4-5 minutes, stirring occasionally, until the meat develops a deep brown crust. This step builds the foundation of flavor—don't rush it. The meat should release easily from the bottom when ready.
🍳 Step 2: Build the Chili Base with Aromatics and Spices
Push the seared meat to one side of the Dutch oven and add the 1 whole yellow onion (diced) and 4 cloves garlic (minced) to the empty space. Cook for 3-4 minutes until the onions soften and the garlic becomes fragrant—you should smell that sweet, pungent aroma. Stir everything together and sprinkle with 2 tbsp chili powder and 1 tbsp ground cumin, coating the meat and onions evenly.
Let the spices toast for 30 seconds until you can smell their warm, earthy notes. Here's the thing—don't skip this step. Toasting the spices releases their oils and deepens the chili's flavor profile. If the spices start to darken too quickly, reduce heat to medium to prevent burning.
🥘 Step 3: Simmer Everything Together for Deep Flavor
Add the 2 cans diced tomatoes, 2 cups beef broth, 1.5 tsp salt, 0.5 tsp black pepper, and the 2 whole bay leaves to the Dutch oven. Stir well to combine, then return the seared bacon to the pot. Bring the mixture to a gentle boil, then reduce heat to low and let it simmer uncovered for 1 hour, stirring occasionally.
After 1 hour, add the 2 cans black beans and 2 cans kidney beans (drained). Stir gently to incorporate, then continue simmering for another 30-45 minutes until the chuck roast is fork-tender. You'll know it's ready when the meat pulls apart easily and the flavors have melded together beautifully. The chili should be thick but still saucy—if it's too thick, add a splash of water or broth.
⏰ Step 4: Rest and Adjust for Perfect Texture
Remove the 2 whole bay leaves and let the chili rest for 10-15 minutes off the heat. This resting period allows the flavors to settle and the chili to thicken slightly. Taste and adjust the seasoning—add more salt if needed, or a pinch of sugar to balance any acidity from the tomatoes. Here's where you can get creative: top with avocado, shredded cheese, or fresh cilantro if you like.
The chili should have a rich, smoky depth with tender beef, crispy bacon bits throughout, and a perfect balance of spice and warmth. Serve immediately with crusty bread or cornbread to soak up every last drop of that flavorful sauce. This chili tastes even better the next day as the flavors continue to develop, so make extra if you can!
Pro Tips For Making Beef And Bacon Chili
- CRISP THE BACON FIRST: Cook the thick-cut bacon until it’s deep golden—not just pink—then pull it out and drain it on paper towels. That extra crisp makes the chili taste richer, and the fat renders perfectly for browning the beef. (Yes, even if you’re tempted to skip it.)
- SEAR THE BEEF IN BATCHES: Chuck roast loves a good crust, but don’t crowd the pan. Work in 2-inch-thick chunks, 3-4 at a time, and let them sit for 2 minutes before stirring. This keeps the meat juicy and caramelizes the outside properly—no one wants dry chili.
- SWEAT THE ONIONS LOW AND SLOW: After browning the bacon, reduce heat to medium-low and cook the onions for 10 minutes before adding garlic. This softens them into a sweet, jammy base instead of a burnt mess. (I learned this the hard way—burnt onions ruin everything.)
- SALT THE BACON BEFORE COOKING: Sprinkle the thick-cut bacon with a pinch of salt before it hits the pan. It crisps faster, renders more fat, and adds a subtle depth the chili needs. (Sounds weird, but it works—trust me.)
Common mistakes when making perfect results
Overcooking the Beef
One of the biggest mistakes is letting the chuck roast simmer too long, turning it tough instead of tender. The meat should reach fork-tenderness after 1.5 hours total—not 2.5 hours. I’ve seen people walk away and forget about it, only to come back to rubbery beef.
Set a timer for 1 hour after adding beans, then test with a fork. If it’s still slightly resistant, give it 15 more minutes max. 🥩
Skipping the Bacon Rest
Leaving bacon on the chili while simmering drains its fat and makes it soggy. Always remove it after searing and set it aside on paper towels. When you add it back in after the initial simmer, it stays crispy.
I’ve tried adding it back too early—it turns into a sad, limp mess. Trust me, the extra 3 minutes of draining is worth it for that perfect crunch. 🥓
Ignoring Spice Toasting
Many people just dump the spices into the pot without toasting them first. This is a flavor crime! Toasting chili powder and cumin for 30 seconds releases their essential oils, giving your chili that deep, aromatic punch.
I once made chili without toasting—it tasted flat. Now I always toast them in the same oil used for searing. The difference is night and day. 🌶️
Using High Heat Too Long
Simmering chili on medium-high heat speeds up cooking but can make the sauce too thin and the flavors uneven. Keep it at low heat after the initial boil to let the ingredients meld properly.
I’ve seen people rush this step, and the result is a watery, bland chili. Patience here means richer, more complex flavors. Think of it like making a fine wine—it needs time to develop. 🍷
Not Adjusting Seasoning
Tasting and adjusting seasoning at the end is crucial, but many skip this step entirely. After simmering, let the chili rest for 10 minutes first—this helps flavors settle. Then taste and add salt, pepper, or even a pinch of sugar to balance acidity.
I’ve had chili that needed another ½ tsp of salt after resting. Don’t be afraid to tweak it—this is where you elevate homemade chili to restaurant quality. 🧂
Adding Beans Too Early
Beans release starch when cooked too long, making the chili gluey. Always add them after the initial 1-hour simmer—this keeps the texture thick and velvety. I’ve seen people add beans at the start, and the result is a mushy, unappetizing mess.
The beans should warm through in just 30-45 minutes while the beef finishes tenderizing. This small detail makes a huge difference. 🫘
Nutrition facts
Frequently asked questions
Can I substitute ground beef for chuck roast in this recipe?
You can, but the texture will differ. Ground beef cooks faster and won't have the same tender, melt-in-your-mouth quality. If using, brown it well first and simmer for only 30-45 minutes total after adding beans. For best results, stick with chuck roast—it's worth the extra effort for that restaurant-quality tenderness.
How do I make this chili spicier?
Add ½ teaspoon cayenne pepper or 1-2 teaspoons hot sauce at the end for heat. For smoky depth, swap regular chili powder for smoked paprika or add ½ teaspoon chipotle powder. Always taste first—you can adjust, but you can't take out the spice once it's in!
Can I make this chili in a slow cooker?
Brown the beef and bacon first, then transfer everything to the slow cooker. Cook on low for 6-7 hours or high for 3-4 hours. The slow cooker keeps the meat tender and the flavors deep. Just add beans in the last 30 minutes to prevent mushiness. Perfect for hands-off cooking!
Why does my chili turn out watery?
Watery chili usually means too much liquid or beans added too early. Simmer uncovered to reduce excess moisture, and always add beans after the initial 1-hour simmer. If it's still thin, let it cool slightly, then skim off excess fat or reduce it further on the stovetop. A splash of cornstarch slurry can help thicken it quickly.
How long will leftovers keep in the fridge?
This chili stays fresh for 5-6 days in an airtight container. The flavors actually improve overnight! For best texture, reheat gently on the stove with a splash of broth or water. Freeze for up to 3 months—just thaw in the fridge before reheating. Perfect for meal prep!