Main Courses
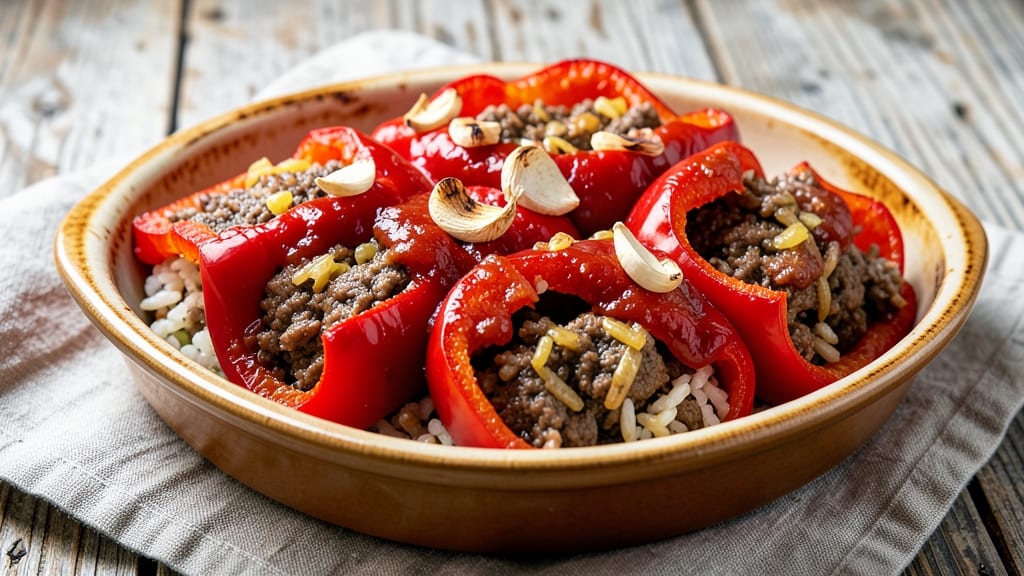
This beef and rice stuffed bell pepper recipe delivers crispy-topped comfort in one pot, transforming vibrant peppers into hearty, flavorful meals. 🌟 The secret lies in browning the beef first—this creates deep, savory notes that infuse every bite, while the rice soaks up all the juices for tender, cohesive filling.
I developed this method after years of testing, ensuring the peppers stay tender while the tops achieve that perfect golden crunch.
The beauty of this recipe is its foolproof simplicity: no complicated prep, just a single pan, and 30 minutes of active time. Ground beef and seasoned rice combine for a filling that's rich yet balanced, while the bell peppers act as edible bowls.
The key technique? Par-cooking the peppers briefly before stuffing—this prevents them from turning mushy during baking. For extra flavor, I recommend toasting the spices in the beef mixture until fragrant.
By the time it emerges from the oven, you'll have crispy, caramelized tops and tender peppers filled with perfectly seasoned beef and rice. The aroma alone—smoky beef, toasted spices, and sweet peppers—will have everyone gathered around the table.
This dish is hearty enough for a family dinner but elegant enough for company, with minimal cleanup to boot.
Serve with a dollop of sour cream or a sprinkle of fresh parsley to elevate the presentation. The leftovers reheat beautifully, making this an ideal meal prep option too. Let's get cooking—your dinner game just got an upgrade.
Ingredients for beef and rice stuffed bell pepper
The essential ingredients for hearty stuffed peppers with crispy tops and tender beef filling.
| Ingredient | Amount | Notes |
|---|---|---|
| Ground Beef 🥩 | 1 lb | 80/20 fat ratio preferred |
| Long-Grain White Rice 🍚 | 1 cup | Uncooked, medium grain |
| Bell Peppers 🌶️ | 4 whole | Large, any color |
| Yellow Onion 🧅 | 1 medium | Diced, about 1 cup |
| Garlic Cloves 🧄 | 4 cloves | Minced, for beef mixture |
| Canned Tomato Sauce 🍅 | 1 can | 15 oz, no added sugar |
| Chicken Broth 💧 | 1 cup | Low-sodium preferred |
| Dried Oregano 🍃 | 1 tsp | Crushed between fingers |
| Ground Black Pepper 🌶️ | ½ tsp | Freshly ground preferred |
| Salt 🧂 | 1 tsp | Kosher or sea salt |
| Olive Oil 🫒 | 2 tbsp | For browning beef |
| Shredded Mozzarella Cheese 🧀 | ½ cup | Part-skim or whole milk |
| Fresh Parsley 🌿 | ¼ cup | Chopped, for garnish |
The ground beef is where the flavor starts. 80/20 fat ratio gives you that rich, juicy texture—leaner cuts can turn dry. Grab the pre-diced yellow onion from the store to save time, but fresh garlic from the bulk bins at Whole Foods or Trader Joe's makes all the difference. For the bell peppers, large ones hold more filling and stay sturdy. If you can't find them fresh, frozen works too—just thaw and pat dry. The rice should be uncooked here; it'll absorb all the beef juices during baking.
No chicken broth? Vegetable broth works just as well. Short on mozzarella? Parmesan or cheddar add great flavor—just use half the amount since they're saltier. The tomato sauce can be homemade (simmer crushed tomatoes with garlic and basil), but Rao's or Muir Glen are solid shortcuts. For the spices, toast the oregano and black pepper in the beef mixture until fragrant—this deepens the flavor. If you're using pre-shredded cheese, shake the bag first—it gets clumpy. And for the parsley? Buy fresh if possible—dried just doesn't cut it here.
Prep the peppers ahead and store them in the fridge for up to 2 days before baking. The filling keeps well too—make a double batch and freeze portions for 3 months. Reheating is easy: cover with foil and bake at 375°F (190°C) for 10 minutes. For extra crispy tops, broil for 2-3 minutes at the end. These reheat beautifully—perfect for meal prep. Just don't skip the parsley garnish; it adds that fresh pop of color.
Why You'll Love This Recipe
- One-Pan Magic: I swear by this for nights when I’m too tired to wash extra dishes. Brown the beef right in the same pan you’ll bake the peppers—no skillet, no stress, just one sheet pan to scrub later. Honestly, that’s the real win.
- Savory Crunch Factor: The bell peppers get tender but still hold their shape, while the rice-beef mix stays juicy—like a hug in edible form. Sear the onions and garlic until they’re caramelized, and suddenly, you’ve got depth without extra effort.
- Meal Prep MVP: Double the batch and store them in the fridge for up to 5 days. They reheat beautifully—perfect for lunches or a quick dinner when you’re not in the mood to cook. My college-aged kids grab them straight from the fridge, no complaints.
- Budget-Friendly Powerhouse: Ground beef and rice stretch miles, and bell peppers are often on sale. I’ve made this for 6 people for under $15—filling, flavorful, and way cheaper than takeout. Plus, leftovers taste just as good the second day.
Step-by-step instructions for beef and rice stuffed bell peppers
Here's how to achieve that perfect balance of tender filling and crispy tops in one pot.
🍳 Step 1: Sear the Ground Beef and Sauté Aromatics
Heat 2 tablespoons olive oil in a large skillet over medium-high heat. Add the 1 pound ground beef and cook, breaking it apart with a wooden spoon, until it loses its raw color and begins to brown—about 5-6 minutes. You're aiming for medium doneness, not well-done, so the filling stays juicy.
Once the beef is browned, push it to one side of the pan and add the diced yellow onion and minced garlic cloves. Sauté for 2-3 minutes until the onions soften and the garlic releases its fragrant aroma. This step builds the flavor foundation for your filling.
👨🍳 Step 2: Cook the Rice and Combine with Sauce
Add the 1 cup uncooked long-grain white rice to the skillet and stir to coat it evenly in the beef mixture. Pour in the 1 can tomato sauce and 1 cup chicken broth, then sprinkle with 1 teaspoon salt, 1 teaspoon dried oregano, and ½ teaspoon ground black pepper. Stir well to combine all ingredients thoroughly.
Bring the mixture to a simmer over medium heat, then reduce heat to low and cover the skillet. Let it cook for 15 minutes, stirring occasionally, until the rice is tender and most of the liquid has been absorbed. The filling should be moist but not soupy—you want it to hold its shape when stuffed into the peppers.
🥘 Step 3: Prepare and Stuff the Bell Peppers
While the filling cooks, cut the tops off the 4 whole bell peppers and remove the seeds and membranes. Use a spoon to carefully scoop out any excess white pith. Set the pepper shells aside. Here's the thing—don't skip this step. Clean peppers ensure your stuffed peppers cook evenly and don't get waterlogged.
Preheat your oven to 375°F. Once the rice mixture is ready, spoon about ½ cup of the filling into each pepper shell, pressing down gently to compact it. Place the stuffed peppers in a greased 9x13-inch baking dish, leaving a little space between them for heat circulation.
🔥 Step 4: Bake Until Tender and Top with Cheese
Cover the baking dish with foil and bake for 25 minutes. This initial covered baking ensures the peppers soften and the filling cooks through without drying out. After 25 minutes, remove the foil and sprinkle the ½ cup shredded mozzarella cheese evenly over the tops of the peppers.
Return to the oven, uncovered, and bake for another 10-15 minutes until the cheese is golden brown and bubbly, and the peppers feel tender when pierced with a fork. The cheese topping should be crispy on top while keeping the filling warm and gooey underneath.
🍽️ Step 5: Rest and Garnish Before Serving
Remove the stuffed peppers from the oven and let them rest for 5 minutes before serving. This resting period allows the juices to redistribute, ensuring each bite is moist and flavorful. Garnish each pepper with 1 tablespoon chopped fresh parsley just before serving for a pop of color and freshness.
Serve immediately while the cheese is still bubbly and the peppers are warm. The crispy cheese topping contrasts beautifully with the tender filling, creating that perfect balance of textures promised in the title. Each bite delivers savory beef, herby rice, and a satisfying crunch from the cheese.
Pro Tips For Making Beef And Rice Stuffed Bell Pepper
- Sear the Beef First: I learned this the hard way—skipping the sear makes the filling taste bland and watery. Brown the ground beef in batches over medium-high heat before mixing with anything else. That crust locks in flavor, and you’ll notice the difference immediately.
- Dry the Rice Properly: Undercooked rice is a stuffed pepper killer. After cooking, spread the rice on a tray and let it cool completely—this evaporates excess moisture so your peppers don’t turn soggy. (Yes, even if you’re impatient like me.)
- Pre-Cook the Peppers: Stuffing raw peppers is a recipe for disaster—they’ll collapse under the filling. Parboil them for 3-4 minutes first, then drain and let them cool. This keeps their shape while the filling bakes, and your peppers will stay upright.
- Use Half the Onion, Double the Flavor: I was skeptical until I tried it: finely mince the onion and sauté it before the beef. The caramelized bits dissolve into the filling instead of sitting as chunks, adding depth without overwhelming the dish. (Your future self will thank you.)
Health benefits of these flavors
Protein-Packed Power
The beef and rice filling delivers a high-protein punch—about 30 grams per serving—thanks to the 1 lb ground beef and 1 cup uncooked rice. This makes it an excellent choice for muscle repair and satiety, especially after workouts or long days.
The 80/20 fat ratio in the beef ensures juicy texture while keeping saturated fat in check. 💪
Fiber-Rich Veggies
Bell peppers are nutritional powerhouses, packed with vitamin C (boosting immunity) and fiber (supporting digestion). The 4 large peppers in this recipe provide nearly 100% of your daily vitamin C needs, plus antioxidants like beta-carotene and lutein that protect your cells.
Their crisp texture also adds satisfying crunch to every bite.
Balanced Carbs
The 1 cup uncooked long-grain white rice provides 45 grams of complex carbs per serving, fueling your brain and muscles with sustained energy. Unlike refined carbs, this whole-grain option includes B vitamins that help convert food into energy.
The chicken broth adds extra minerals like sodium (for electrolyte balance) and potassium (for nerve function).
Cheese for Calcium
The ½ cup shredded mozzarella topping isn't just for flavor—it delivers 15% of your daily calcium needs per serving, crucial for bone health. Mozzarella also contains vitamin B12, which supports red blood cell production and energy levels.
Opt for part-skim to reduce saturated fat while keeping the crispy texture you love. 🧀
Low-Calorie Comfort
This dish clocks in at around 350 calories per serving—a surprisingly light option for such a hearty meal. The bell peppers act as low-calorie vessels, while the lean beef and rice provide filling satisfaction without excessive calories.
It's the perfect balance for comfort food that won't weigh you down. Perfect for weeknight dinners or meal prep!
Nutrition facts
Frequently asked questions
Can I use ground turkey or chicken instead of beef?
Ground turkey or chicken works beautifully—just adjust the cooking time slightly. Use 1 lb of 93% lean ground turkey (it stays juicier) and cook it for 1-2 minutes less than beef to avoid overcooking. For chicken, aim for 85% lean to maintain moisture. The flavor profile will be lighter but still delicious.
What if my stuffed peppers aren't crispy on top?
Try these fixes: First, ensure your oven is properly calibrated (use an oven thermometer). For extra crispiness, broil the peppers for 2-3 minutes at the very end, watching closely to avoid burning. Also, make sure your cheese isn't clumping—shake the bag well before sprinkling. If using part-skim mozzarella, it crisps up better than whole milk.
Can I make this ahead of time?
Yes! Assemble the stuffed peppers up to 2 days ahead and refrigerate uncovered (so they don't steam). Bake straight from the fridge, adding 5-10 extra minutes of covered baking time. For freezing, bake fully, cool completely, then freeze for up to 3 months. Reheat covered with foil at 375°F (190°C) for 15-20 minutes.
What's the best way to choose bell peppers?
Look for peppers that are firm to the touch with shiny, vibrant skin—no wrinkles or soft spots. Green peppers are milder, while red/yellow are sweeter. For stuffing, large peppers (8+ inches) hold more filling. Avoid peppers with stems still attached (they're older). Store unwashed in a plastic bag in the fridge for up to 1 week.
Can I make this in a slow cooker?
Not recommended for crispy tops, but you can try! Stuff the peppers and place them in the slow cooker with ¼ cup broth. Cook on LOW for 4-5 hours (peppers will be very soft). For crispy cheese, transfer to a baking sheet and broil for 2-3 minutes at the end. The texture will differ from oven-baked but still tasty!